CaseLink User Training Guide
This guide walks you through each screen in CaseLink from login to referral submission. Follow the steps in order for a complete introduction to the system.
Welcome & Login Screen
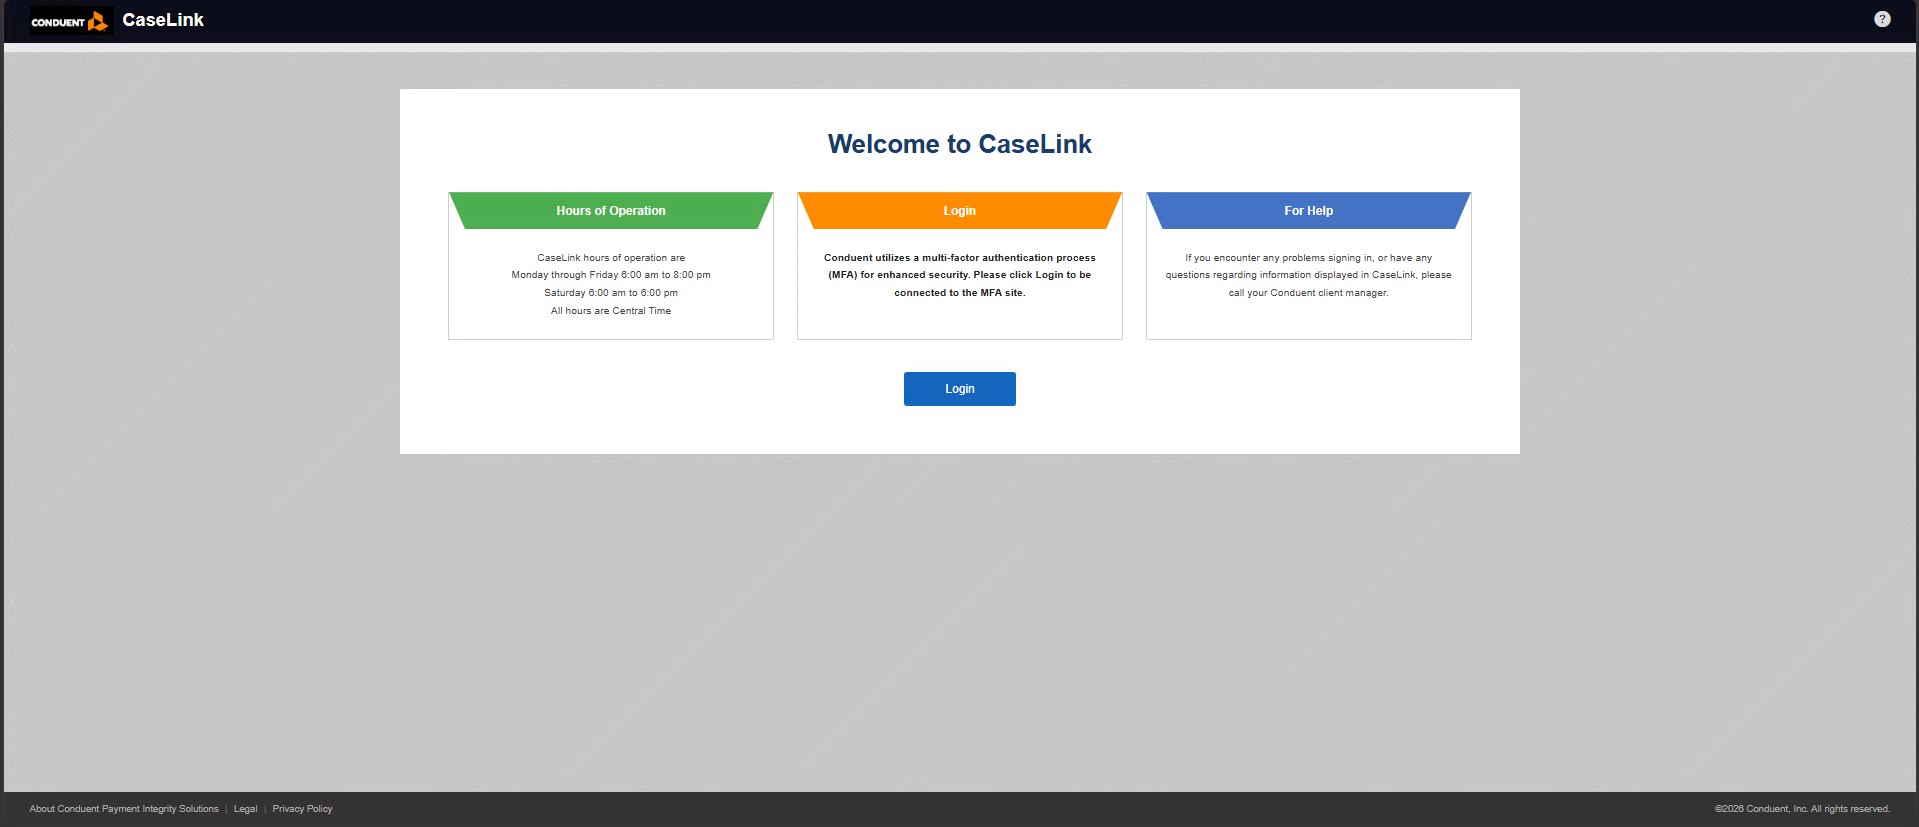
The Welcome to CaseLink page is the first screen you see when you navigate to the application URL. It provides three information panels:
- Hours of Operation – CaseLink is available Monday–Friday 6:00 am–8:00 pm and Saturday 6:00 am–6:00 pm (all times Central).
- Login – Conduent uses Multi-Factor Authentication (MFA) for enhanced security. Clicking Login redirects you to the MFA site.
- For Help – If you have trouble signing in or have questions, contact your Conduent Account Manager.
- Open your browser and navigate to the CaseLink URL provided by your Account Manager.
- Review the hours-of-operation panel to confirm the system is available.
- Click the blue Login button at the bottom of the page.
- Complete the MFA challenge on the Conduent identity page.
- Upon successful authentication you are taken directly to Case Search.
Case Search
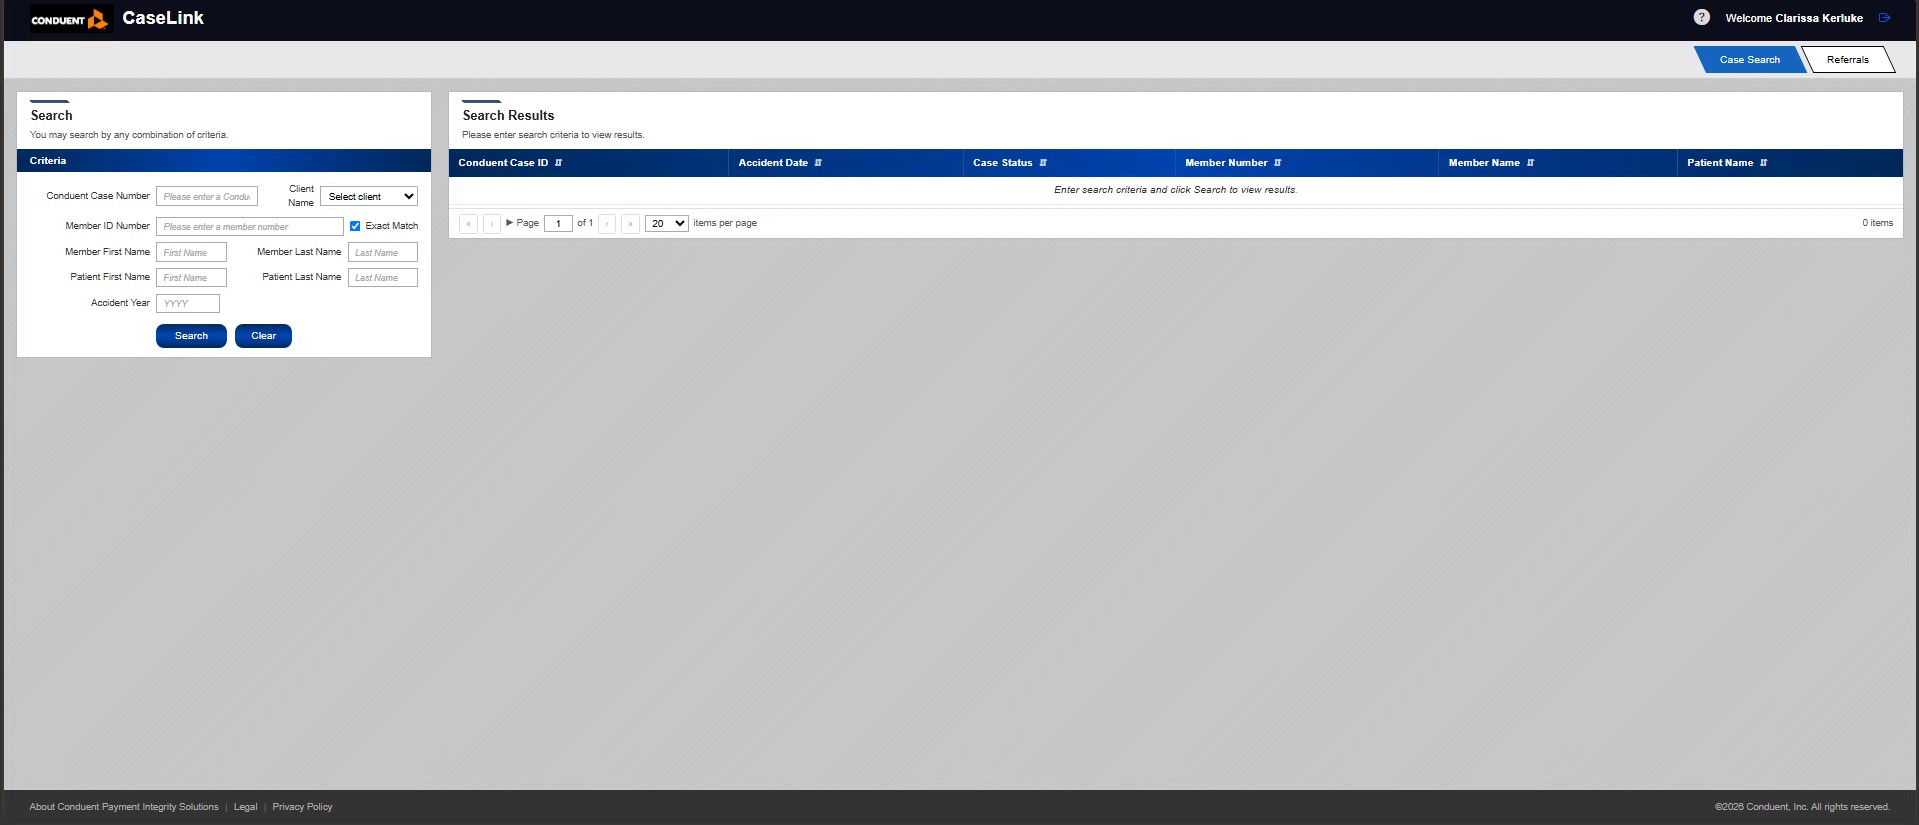
After logging in you land on the Case Search page, accessible at any time via the Case Search button in the navigation bar. You can search by any combination of the following criteria:
| Field | Description |
|---|---|
| Conduent Case Number | Enter a full or partial Conduent-assigned case identifier. |
| Client Name | Select a client from the drop-down list to filter cases for that client. |
| Member ID Number | Enter the insured member’s ID. Check Exact Match to require a precise match. |
| Member First / Last Name | Partial name searches are supported. Useful when you know only part of the member’s name. |
| Patient First / Last Name | Search by the patient involved in the incident (may differ from the member). |
| Accident Year | Enter a four-digit year (e.g., 2023) to narrow results to cases for that accident year. |
- At least one field must be filled before submitting; a validation message will appear if the form is empty.
- Click Search to submit your criteria and view matching cases in the Results panel.
- Click Clear to reset all fields and start a new search.
- Results are paginated — use the page controls at the bottom of the results panel to navigate.
Case Search Results
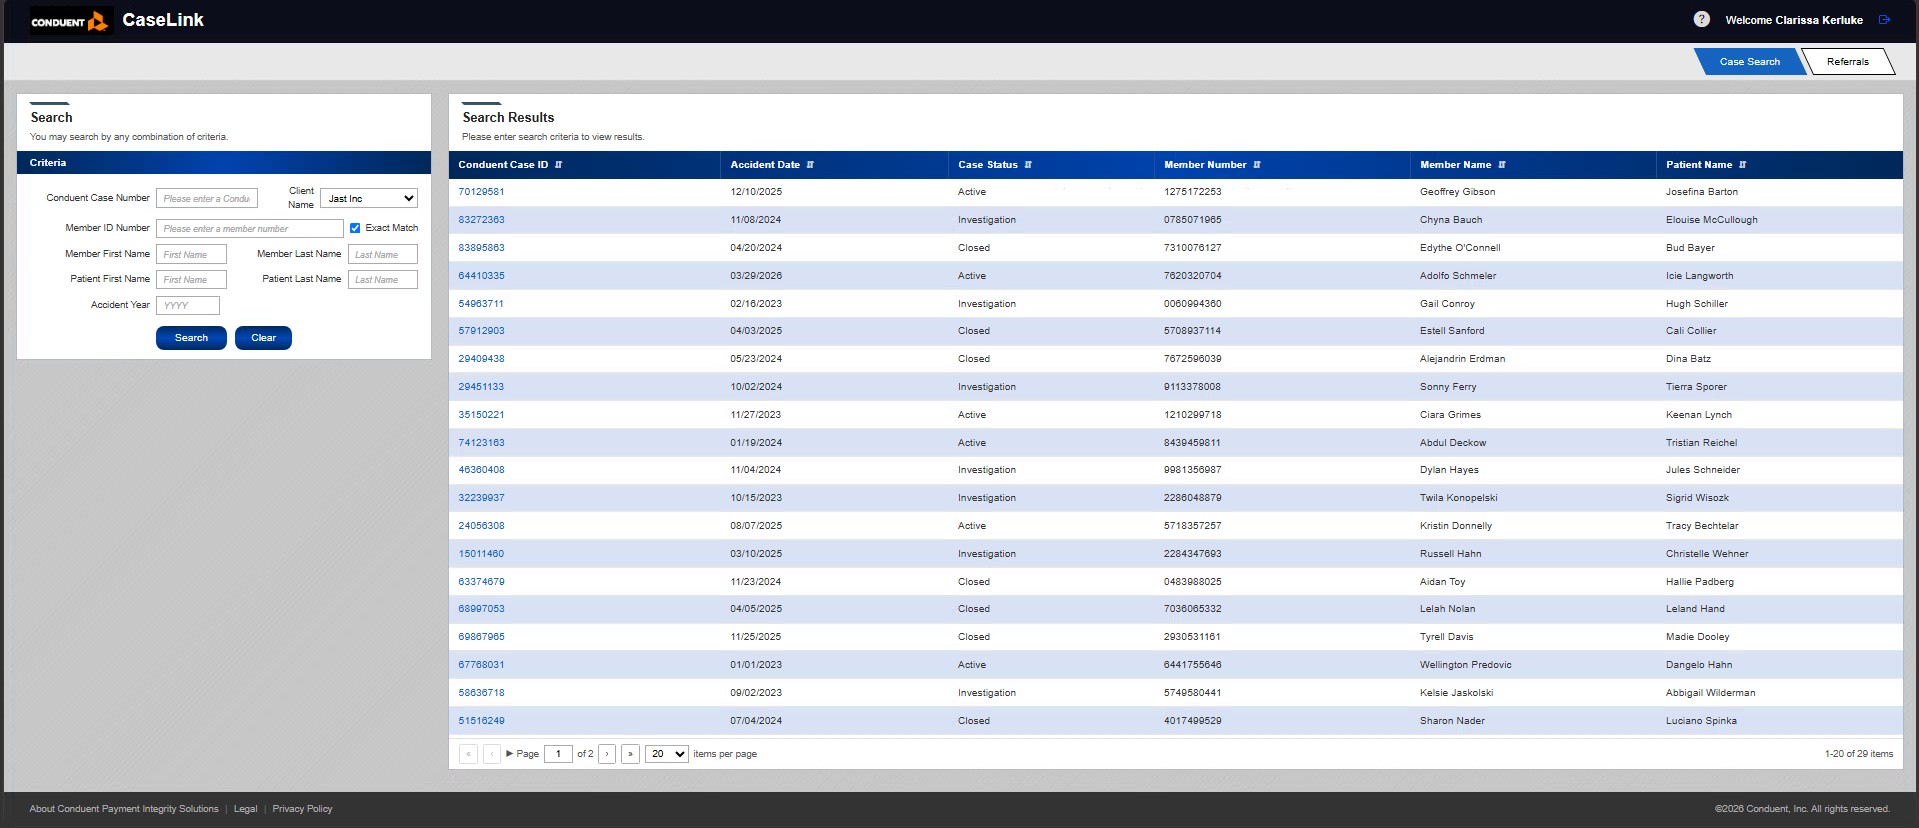
After clicking Search, the Search Results panel on the right displays all cases matching your criteria. Each row shows:
| Column | Description |
|---|---|
| Conduent Case ID | Unique case identifier. Click the link to open the full case detail. |
| Accident Date | Date of the accident associated with the case. |
| Case Status | Current lifecycle status (e.g., Open, Closed). |
| Member Number | The insured member’s ID number. |
| Member Name | Full name of the insured member. |
| Patient Name | Name of the patient involved in the incident. |
- Use the « ‹ › » buttons to navigate to the first, previous, next, and last page.
- Type a page number directly into the page input box and press Enter.
- Change the items per page dropdown (20 or 50) to control how many results appear on each page.
- The item counter (e.g., 1–20 of 47 items) shows your current position.
View Case Details
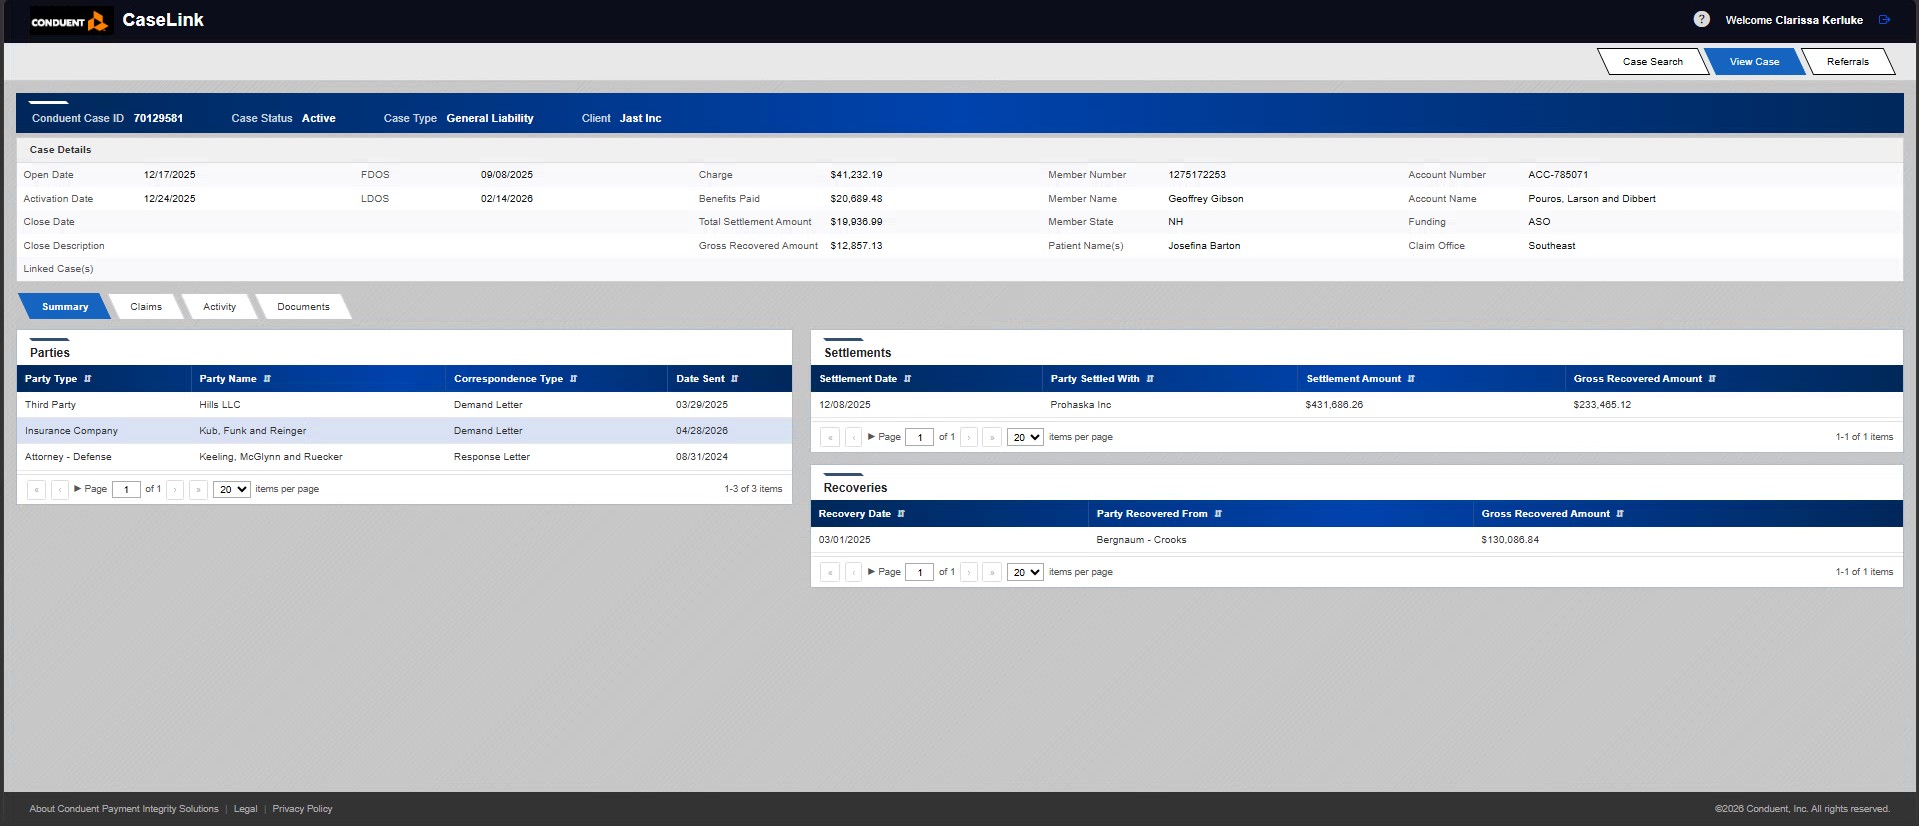
Clicking a Conduent Case ID in the search results opens the View Case screen. The top of the page displays a header bar with the case’s key identifiers, followed by a Case Details table containing all case-level information.
Case Header Bar
Displays three quick-reference fields:
- Conduent Case ID — The unique case number.
- Case Status — Current status (Open / Closed / etc.).
- Case Type — Classification of the case type.
- Client — Client name for the case.
Case Details Table
The details table provides a comprehensive summary of case data:
| Field | Description |
|---|---|
| Open Date | Date the case was opened. |
| Activation Date | Date the case became active for investigation. |
| Close Date | Date the case was closed (if applicable). |
| Close Description | Reason or description for case closure. |
| FDOS / LDOS | First and Last Dates of Service covered by the case. |
| Charge | Total charge amount associated with the case. |
| Benefits Paid | Total benefits paid by the health plan. |
| Total Settlement Amount | Sum of all settlements reached on this case. |
| Gross Recovered Amount | Total gross recovery amount collected. |
| Member Number / Name / State | Insured member’s identification details. |
| Patient Name(s) | Name(s) of patient(s) associated with the case. |
| Account Number / Name | Client account information. |
| Funding | Funding type for the plan (e.g., Self-funded, Fully insured). |
| Claim Office | Office responsible for processing the claims. |
| Linked Case(s) | Any related or linked case IDs. |
Case Detail Tabs
Below the Case Details table is a tabbed section that organises additional case information into four tabs. Click any tab heading to load its content. Tab content is loaded on demand to keep the page fast.
The default Summary tab displays three panels side-by-side, giving a quick overview of the key relationships and financial outcomes for the case.
Parties Panel
Lists all parties involved in the case:
- Party Type — Role of the party (e.g., Attorney, Insurer, Employer).
- Party Name — Name of the organisation or individual.
- Correspondence Type — Type of correspondence sent to this party.
- Date Sent — Date the correspondence was sent.
Settlements Panel
Lists all settlements reached on this case:
- Settlement Date, Party Settled With, Settlement Amount, Gross Recovered Amount.
Recoveries Panel
Lists all recovery transactions:
- Recovery Date, Party Recovered From, Gross Recovered Amount.
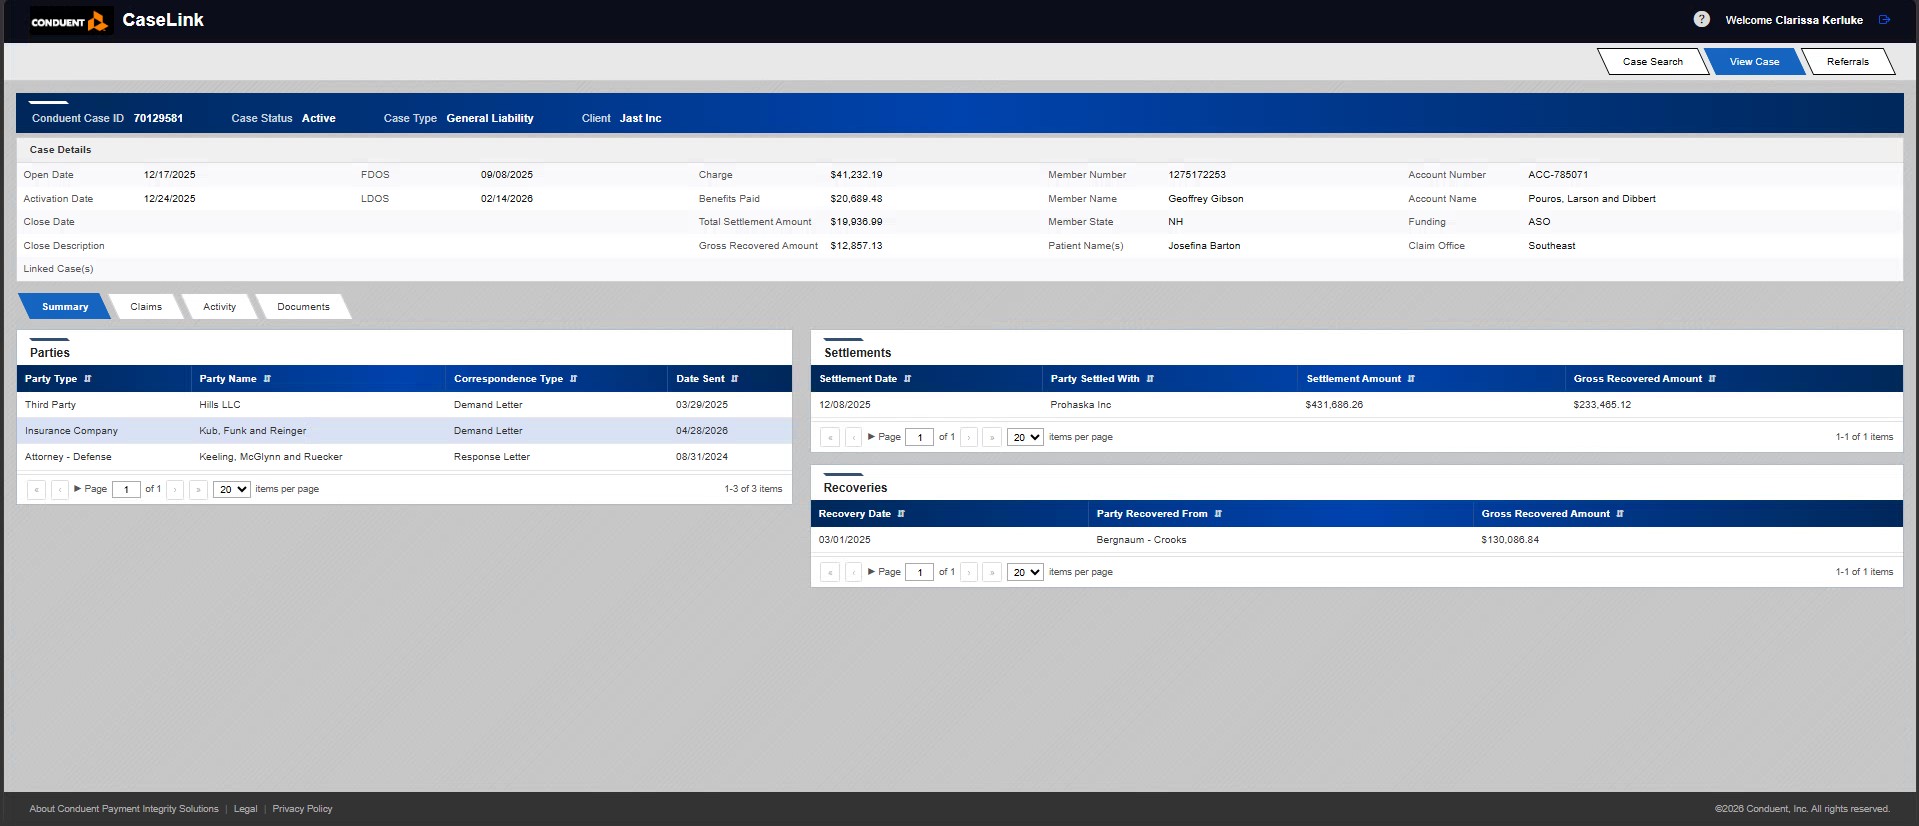
The Claims tab lists all medical claims associated with the case, along with a Diagnosis Summary that groups diagnosis codes for quick clinical review.
Claim Details Columns
- Patient Name — The patient associated with the claim.
- Claim Number — Unique identifier for the claim.
- FDOS — First Date of Service — the start date of the service period covered by the claim.
- LDOS — Last Date of Service — the end date of the service period covered by the claim.
- Provider — The healthcare provider who submitted the claim.
- DX Codes — ICD-10 diagnosis codes (Dx1, Dx2, Dx3) linked to the claim.
- Procedure Codes — CPT procedure codes associated with the claim.
- Paid Date — Date the benefit payment was issued.
- Claim Amount — Total billed amount for the claim.
- Benefit Amount — Amount paid by the health plan.
- Client Fee Amount — Amount recovered or collected on the claim.
- Conduent Fee Amount — Fee applied to the recovered amount per the applicable fee schedule.
Claim Snapshot
The right side of the tab includes a Claim Snapshot panel with summary boxes for Claim Amount, Benefit Amount, Net Recovered Amount, and Conduent Fee Amount.
Diagnosis Summary
On the right side of the Claims tab, the Diagnosis Summary section displays ICD diagnosis codes and their descriptions, helping you quickly identify the medical nature of the case.
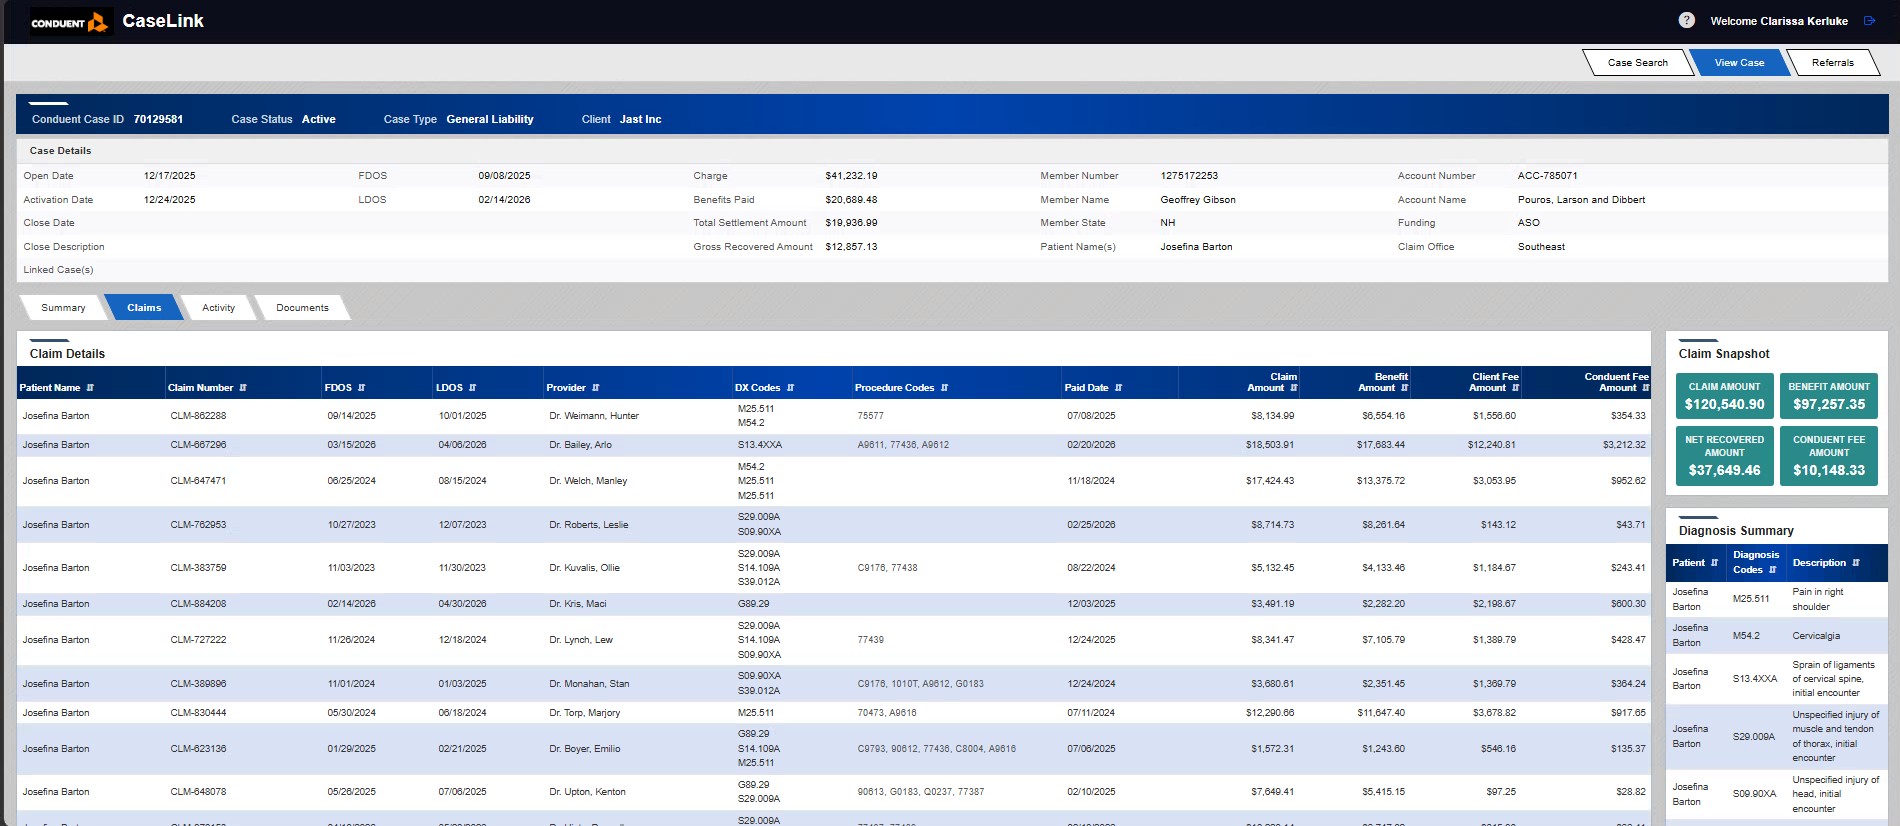
The Activity tab displays the full audit trail and case notes in two side-by-side panels.
Activity Panel
- Activity Date — Date the action was recorded.
- Activity Description — A description of the action taken (e.g., letter sent, settlement negotiated, case reopened).
Notes Panel
- Description — Note type or note description.
- Date — Date the note was recorded.
- Text — Note text shown for the case.
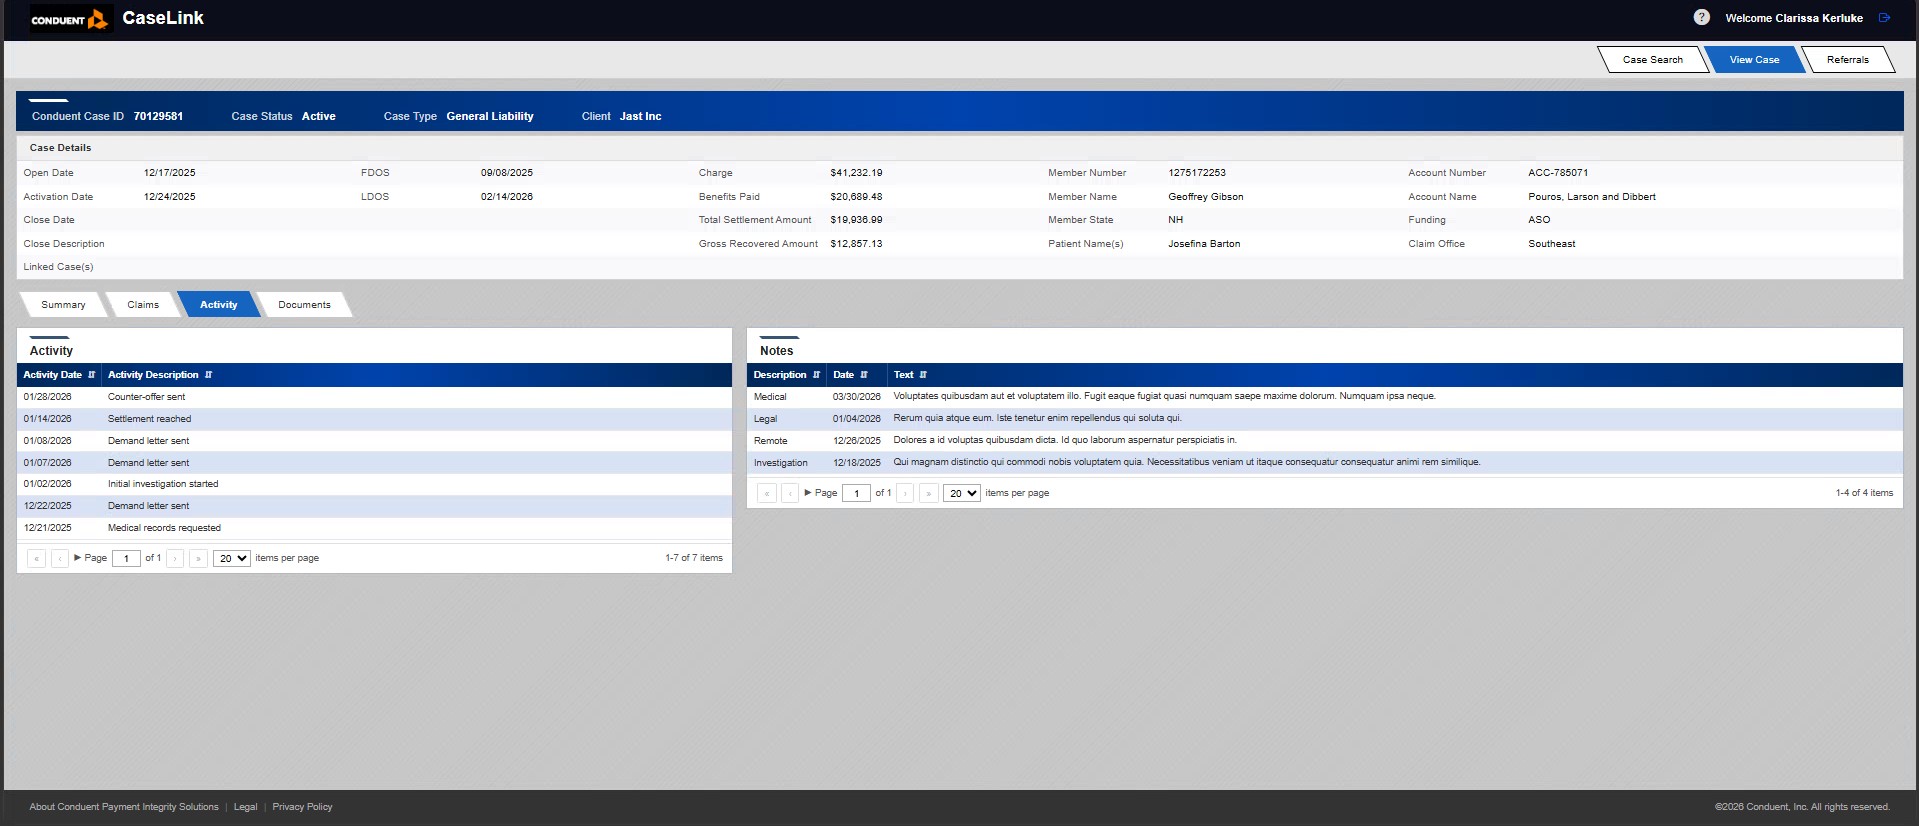
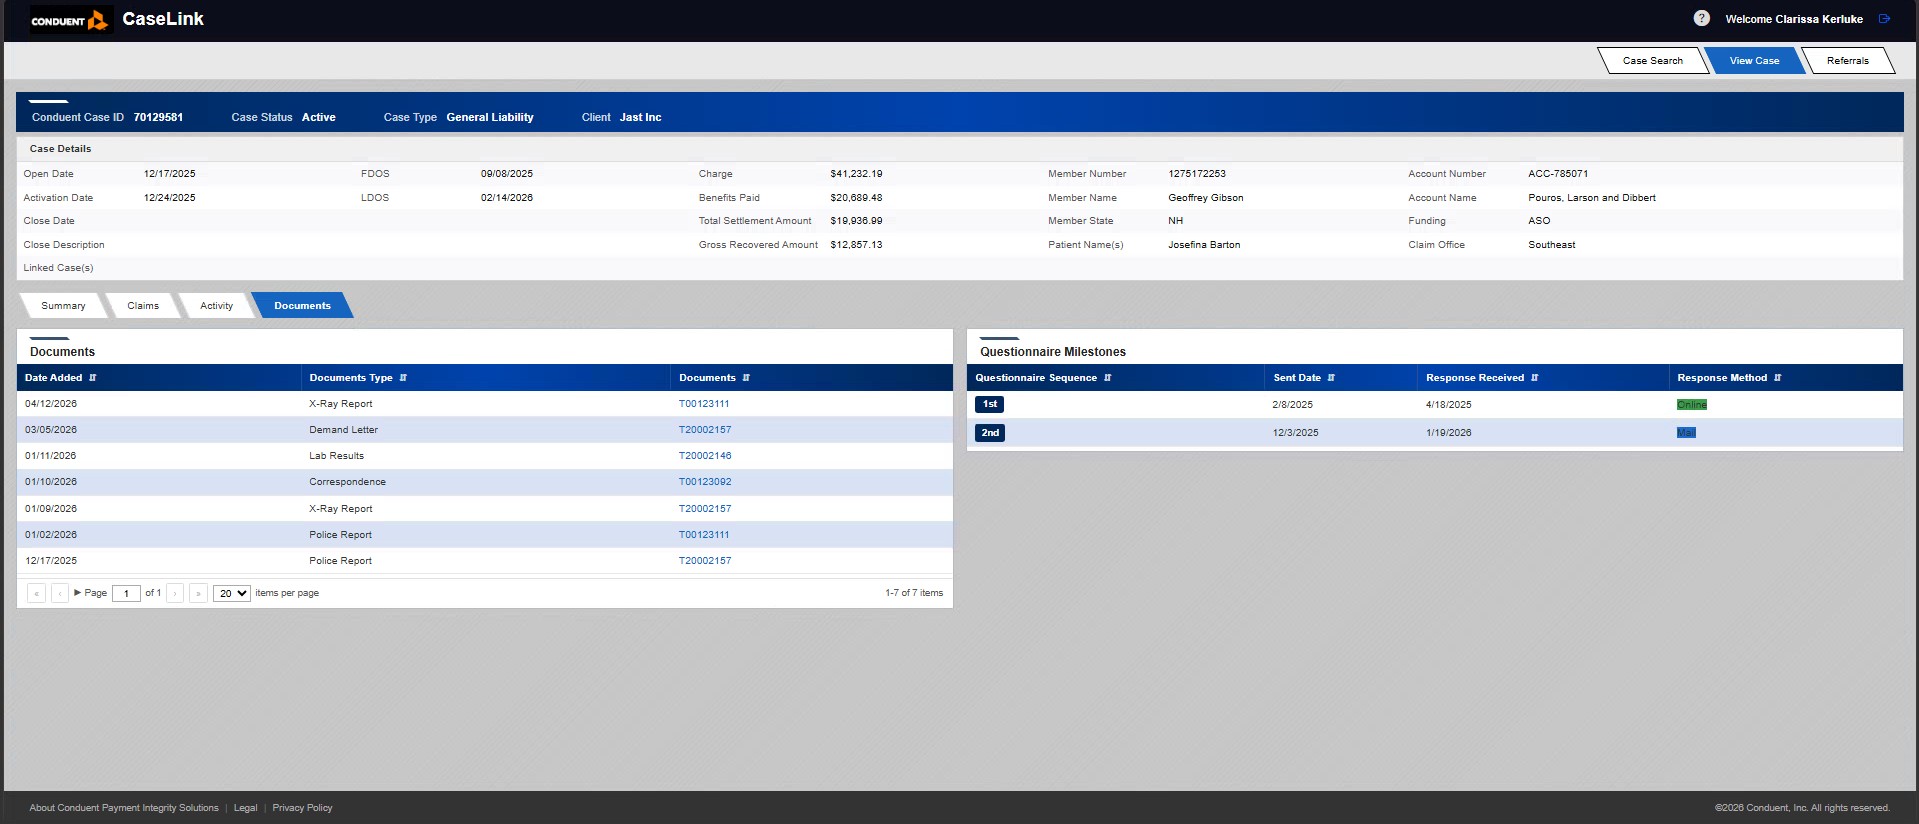
The Documents tab lists all document images attached to the case, such as medical records, police reports, and correspondence.
- Date Added — Date the document was generated or received.
- Documents Type — Document type shown for the image record.
- Documents — Document identifier.
Questionnaire Milestones
- Questionnaire Sequence — Sequence number for the questionnaire milestone.
- Sent Date — Date the questionnaire was sent.
- Response Received — Date a response was received.
- Response Method — Method recorded for the questionnaire response.
Referrals
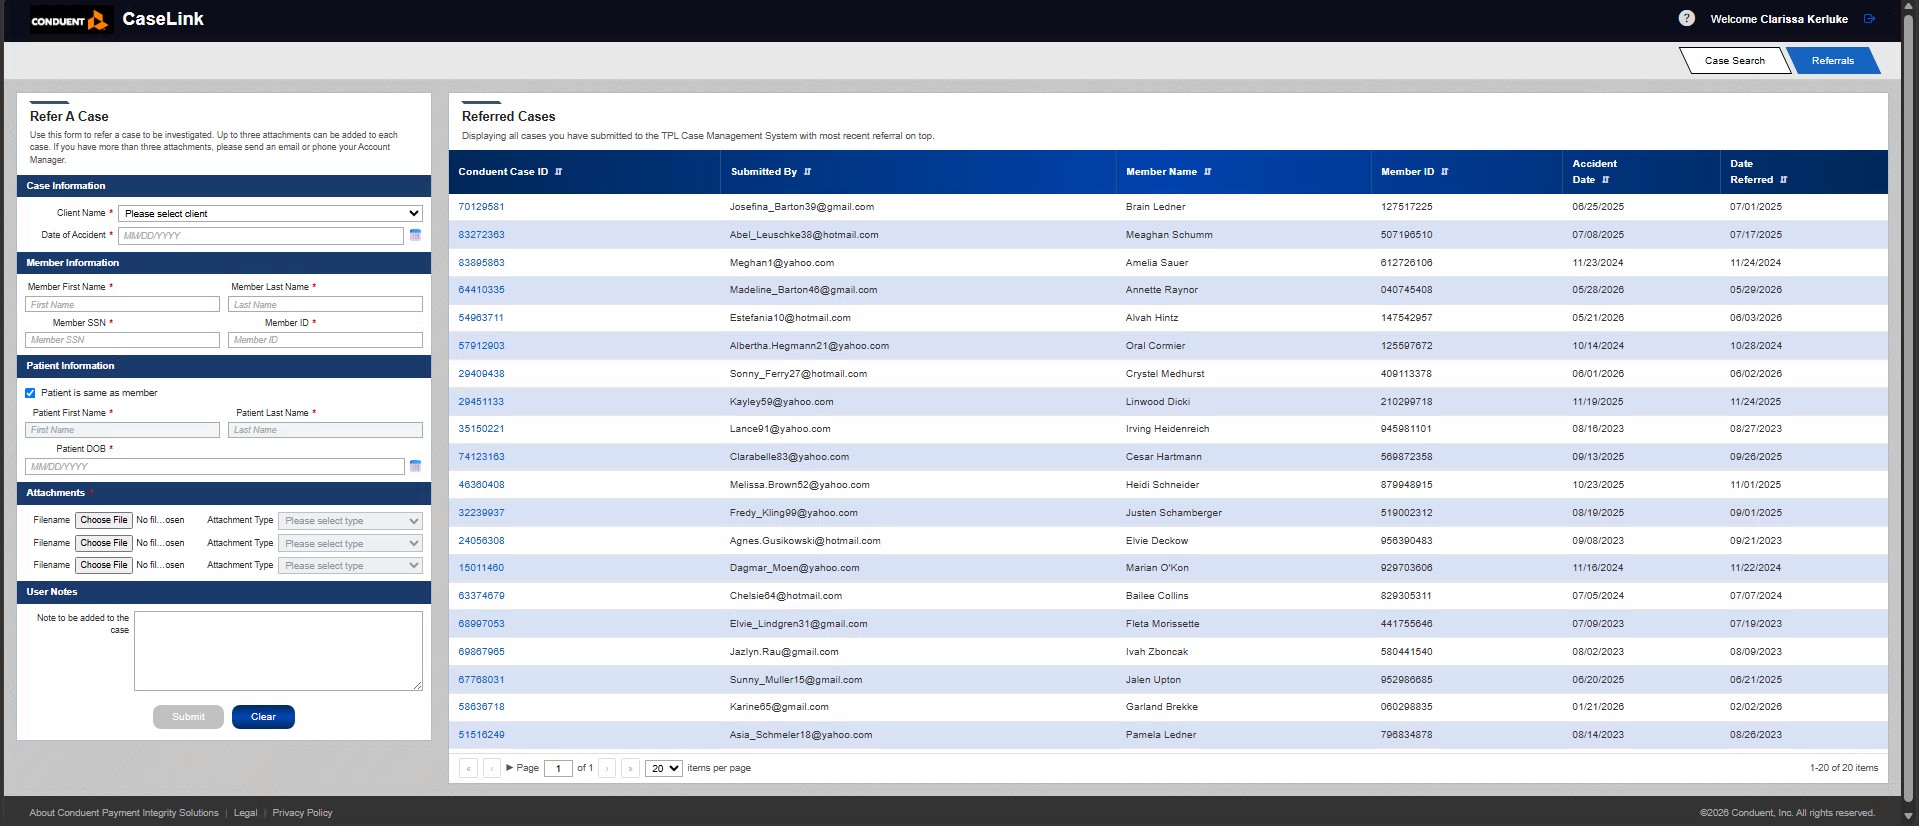
The Referrals page (accessible via the Referrals button in the navigation bar) lets you submit new subrogation referrals and review cases you have previously submitted.
Refer A Case Form (left panel)
Complete the form sections in order to submit a new referral:
Case Information
- Client Name — Select the client from the dropdown. If your account is associated with a single client, this field is auto-selected and locked.
- Date of Accident — Enter the accident date in
MM/DD/YYYYformat or use the calendar picker.
Member Information
- Member First / Last Name — Full name of the insured member.
- Member SSN — Social Security Number in
###-##-####format. - Member ID — The member’s insurance ID number.
Patient Information
- Check Patient is same as member to auto-populate patient name fields from the member fields above.
- Otherwise, enter the Patient First / Last Name and Patient DOB.
Attachments
- At least one file attachment with a document type is required.
- You can attach up to three files per referral.
- Accepted formats:
.xls, .xlsx, .pdf, .doc, .docx, .ppt, .pptx, .csv, .txt. - For each attachment, select the Attachment Type (Medical Records, Insurance Card, Police Report, or Other).
- If you need to attach more than three files, contact your Account Manager.
User Notes
Enter any free-text notes you wish to add to the case. These notes are attached to the referral record.
- Complete all required fields: Client Name, Date of Accident, Member First and Last Name, at least one Member identifier, Patient First and Last Name, Patient DOB, and at least one attachment with a document type.
- Click Submit. A confirmation banner appears at the top of the form if submission is successful.
- Click Clear to reset all fields if you need to start over.
- If there are validation errors, a red error panel lists every field that needs attention.
Referred Cases Table (right panel)
The right panel lists all referrals you have previously submitted, most recent first. The grid includes Conduent Case ID, Submitted By, Member Name, Member ID, Accident Date, and Date Referred.
| Column | Description |
|---|---|
| Conduent Case ID | Unique case number for the referred case. Click the link to open the case. |
| Submitted By | User who submitted the referral. |
| Member Name | Name of the member associated with the referral. |
| Member ID | Member identification number submitted with the referral. |
| Accident Date | Date of the accident entered on the referral. |
| Date Referred | Date the referral was submitted to the system. |
The table also includes page navigation controls and an items-per-page selector for browsing longer referral histories.